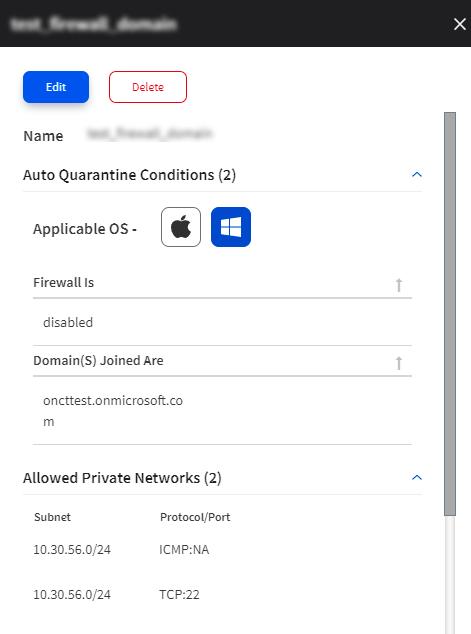
Xaccess Quarantine templates
A Xaccess Quarantine template is an Auto Quarantine template with a set of auto-quarantine conditions to check the device-posture of the user assets in the Xaccess private network. The Auto Quarantine template is applied at the level of an Xshield User group (AD groups or AD departments). Auto Quarantine templates can help you automatically filter out vulnerable Remote endpoints across all the User groups in your instance and block their access to critical applications in the private network. When the endpoints are not vulnerable anymore, they are automatically reintroduced into the private network, and their Xaccess policies are restored. Throughout the Auto Quarantine process, the auto-quarantined assets are reachable from Xshield for further analysis. You can also monitor the auto-quarantined assets from the Xaccess Dashboard.
Auto Quarantine conditions
Auto Quarantine conditions are the device-posture check rules used to evaluate the vulnerability status of the user assets. Assets can be auto-quarantined based on one or multiple Auto Quarantine conditions. Multiple conditions are equivalent to a logical OR, and the asset is quarantined if it does not meet one of the conditions.
Auto Quarantine conditions are evaluated at the level of an asset. So, for an asset that two or more users share, all asset users will be unable to use Xaccess policies on the asset.
| Condition | Description | Windows | macOS |
|
Disk Encryption |
If hard disk encryption is disabled on the asset |
No |
Yes |
|
Domain (s) Joined |
Specify the domains from which logged-in users must be auto-quarantined. This can be used to direct users from some domains to the allowed private networks and domains. |
Yes |
Yes |
|
Firewall |
If the native firewall is disabled on the asset |
Yes |
Yes |
|
OS Last Update |
Time in days since the OS was last updated on the asset Can be set from 7 days and up to 180 days. A higher value corresponds to a relatively more vulnerable asset. |
Yes |
Yes |
How Auto Quarantine works
The Auto Quarantine process includes Auto quarantine assets when they are vulnerable and Unquaratine them when they are healthy.
-
Auto quarantine - the agent on the asset periodically reports the status of the Auto Quarantine conditions to the instance. If the asset meets either of the conditions, the Auto Quarantine template assigned to the asset's Xshield User group is active, and the relevant auto quarantine policies are pushed to all the CT Brokers for the instance. The access of the asset is confined to the allowed private networks and domains defined for the template. You can specify emergency-access, provisioning, or enrollment domains that users must access if the asset is auto-quarantined.
-
Unquarantine - to regain access to the private network, the asset must be recovered to a healthy state using the OS-native procedures. If the asset does not meet the Auto Quarantine conditions, the Auto Quarantine policies are revoked, and the access is restored to the Xaccess policies for the asset. For remote users, you can list the OS-native procedures on a shared private emergency-access domain used for all Auto Quarantine templates in the instance.
Xaccess Quarantine templates are active only when the vulnerable endpoint assets are remote. When an auto-quarantined asset goes Local (after the DNS reachability check), the access for the asset is restored to the Xaccess policies for the asset.
Create Auto Quarantine templates
Create at least two Auto Quarantine templates (one each for Windows and macOS) before you start grouping users into User groups. We recommend that you assign the appropriate Auto Quarantine templates when you create User groups for added security.
|
See Auto-Quarantined assets
-
To see the count for auto-quarantined assets, go to Xaccess > Xaccess Dashboard, and drill down the ENDPOINTS QUARANTINED widget. You will see the Assets page filtered by the auto-quarantined assets.
Edit Auto Quarantine templates
Edit Auto Quarantine templates when you want to:
-
Add more Auto Quarantine conditions or change the existing conditions to enforce stricter access to User assets. You can remove conditions to allow temporary access to some User assets. For example, if you discover a recent vulnerability with an OS, you can lower the value for the OS Last Update condition and allow access only to User assets patched for the vulnerability.
-
Add or modify the private emergency-access networks and/or domains for the template. For example, when a private network or domain is not accessible to the auto-quarantined assets.
Changes made to the Auto Quarantine template are active for the associated User groups in a few seconds.
-
Click an Auto Quarantine template and click Edit in the fly panel.
-
Make the changes and click Save.
Delete Auto Quarantine templates
Auto Quarantine templates that are currently associated with User groups cannot be deleted. You must associate a different template to a User group before you delete a template.
-
Click an Auto Quarantine template and click Delete in the fly panel.
